
2026年10月15日
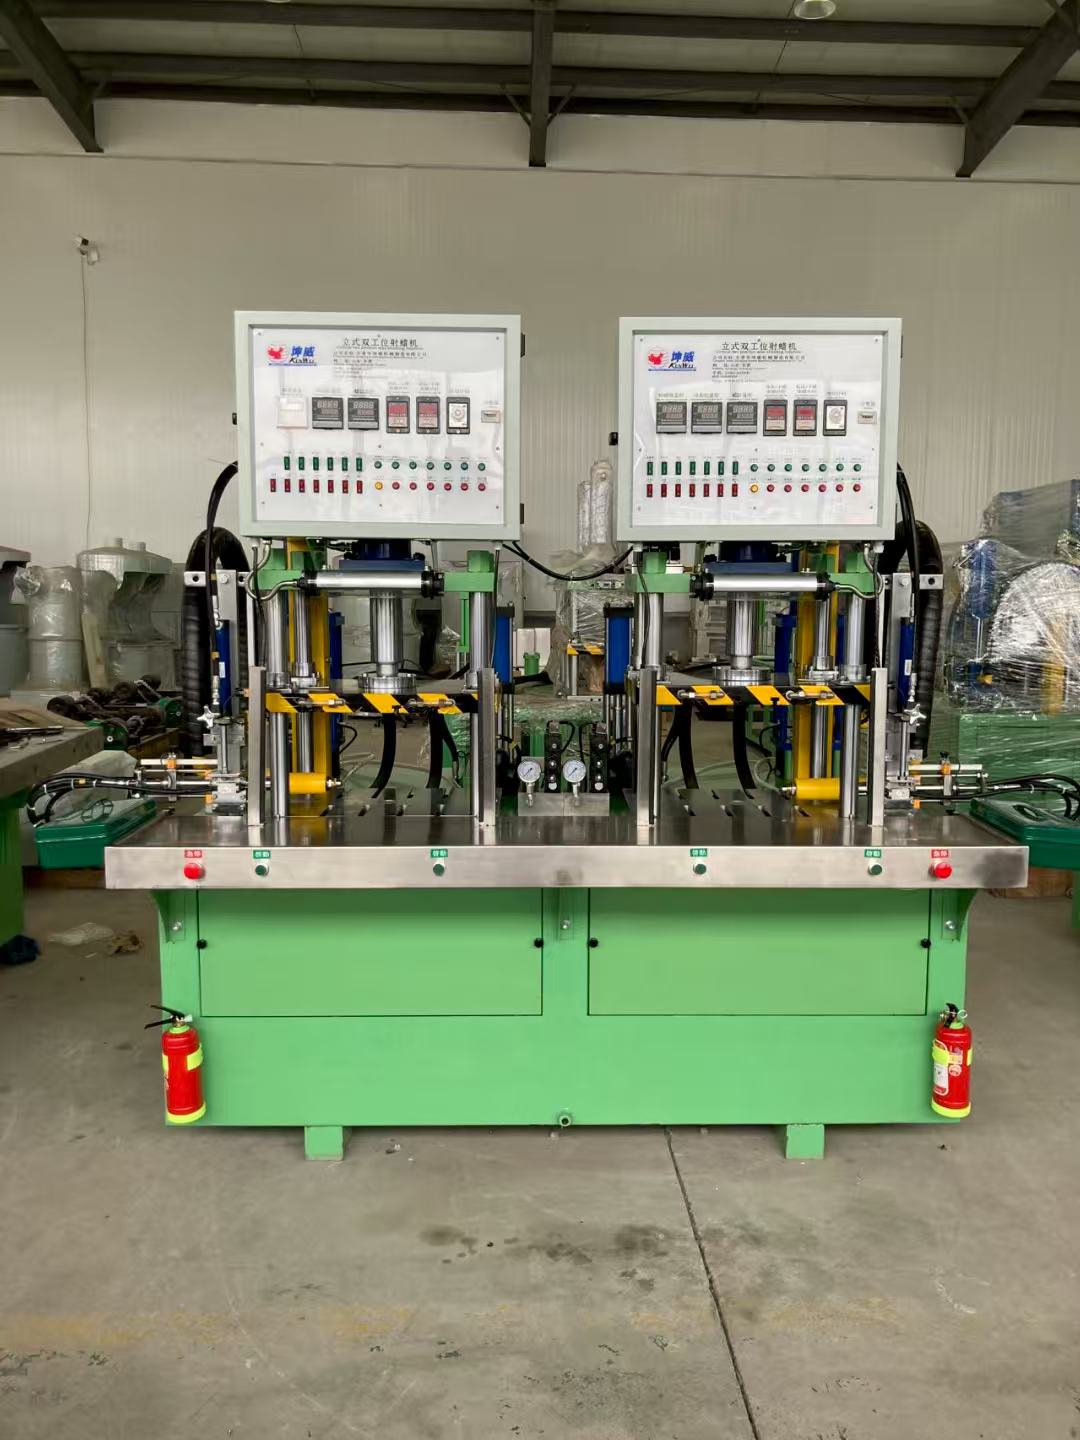
Wax Injection Machine delivers precise efficient wax molding for jewelry casting with stable pressure easy operation and reliable performance

How a Wax Injection Machine Works in Lost Wax Casting
In lost wax casting operations, a wax injection machine serves as the foundation of pattern quality. We rely on these systems to melt solid casting wax, maintain it at a precise liquid viscosity, and inject it under controlled pressure into rubber, silicone, or metal molds. The entire process bridges the gap between master model creation and final investment casting.
Operating Principle of Pneumatic and Vacuum Injection
A modern wax injection machine operates via positive pneumatic pressure, vacuum-assisted pressure, or a combination of both:
- Pneumatic Injection: Compressed air forces liquid wax out of the heated reservoir through the nozzle into the mold cavity. Regulated air pressure ensures complete fill before the wax solidifies.
- Vacuum-Assisted Injection: The system pulls a vacuum inside the mold chamber immediately before injection. Removing ambient air eliminates backpressure and micro air pockets, allowing the molten wax to flood intricate filigree and sharp corners smoothly without voids.
Creating Defect-Free Wax Patterns
The quality of the final metal casting depends directly on pattern accuracy. Our wax injection systems eliminate the variables that cause structural casting defects:
- Prevents air entrapment: Evacuation cycles prevent trapped air bubbles along thin cross-sections.
- Controls shrinkage: Stable pressure hold cycles feed molten wax continuously as the pattern cools inside the cavity, eliminating sink marks.
- Maintains dimensional repeatability: Uniform mold clamping and automated cycle times guarantee identical pattern weights across high-volume production batches.
Essential Components of a Wax Injection Machine
Reliable injection requires tight synergy between key mechanical and thermal components:
- Melting Pot (Reservoir): An insulated, sealed aluminum or stainless steel chamber engineered for uniform thermal conduction. It liquifies pattern wax evenly, preventing hot spots and carbonization.
- Injector Nozzle: A temperature-controlled dispensing tip positioned at the front of the pot. Independent heating elements prevent wax from freezing inside the orifice between injection cycles.
- Pressure Gauge and Regulator: Precision control assemblies that deliver stable, micro-adjustable air pressure to maintain exact shot volumes.
- Mold Clamp: A mechanical or pneumatic clamping unit that applies uniform, balanced pressure across mold parting surfaces to prevent wax flash and mold distortion during injection.
Types of Wax Injection Machines
Selecting the right wax injector depends on your production volume, mold complexity, and tolerance for manual finishing. We categorize wax injection systems into three primary tiers:
Manual Air-Pressure Wax Injectors for Artisan Studios
Manual pneumatic units are the backbone of small studios, custom jewelers, and repair shops producing short runs. Operation: You seat the rubber mold against the injector nozzle by hand and press forward to actuate the wax flow. A basic wax injection machine for investment casting relies on steady shop air to push molten wax from the reservoir into the mold. Best for: Low-volume custom work, solid signet rings, heavy pendants, and simple geometric castings. Trade-offs: Operator fatigue can cause inconsistent clamping pressure, leading to parting-line flash or short shots if the mold shifts during injection.
Digital Vacuum Wax Injection Machines for Intricate Filigree
Standard air-pressure injectors tend to trap air pockets inside intricate, thin-walled molds. A digital vacuum unit solves this by pulling a negative pressure vacuum on the mold cavity immediately before wax delivery. Operation: The operator places the rubber or silicone mold against an airtight vacuum seal. The unit pulls all residual air from the interior cavities before opening the wax valve, drawing liquid wax into every fine channel. Best for: Micro-pave settings, complex filigree, multi-tiered galleries, and high-detail figurines. Core Advantage: Delivers bubble-free patterns and complete fills without requiring excessive injection pressure or higher wax temperatures.
Fully Automatic Wax Injectors with Auto-Clamping for Mass Manufacturing
For commercial manufacturing runs, manual mold holding creates unacceptable weight variances between parts. High-throughput facilities rely on an automatic wax machine for precision investment casting to automate the entire injection sequence. Auto-Clamping Mechanism: Pneumatic or hydraulic platens grip the mold at a preset force, holding the parting line sealed against injection pressures to stop wax leakage. Digital Recipe Storage: Operators store calibrated parameters—vacuum draw time, injection pressure, clamp force, and dwell cooling time—for specific mold libraries. Best for: Industrial investment casting plants, multi-station jewelry manufacturing floors, and standard production trees requiring repeatable pattern weights and zero flash.
Essential Features to Consider Before Buying a Wax Injection Machine
Selecting the right wax injection machine directly impacts pattern yield, cycle speed, and downstream surface quality. When evaluating equipment for an active production floor, we focus on four core hardware features that determine operational reliability and pattern precision, especially when balancing the advantages and disadvantages of lost wax casting across different production volumes.
Dual Digital Temperature Controllers for Tank and Nozzle
Uniform thermal management prevents premature chilling and wax degradation. A single heat zone creates uneven flow because the injector nozzle acts as a heat sink.
- Independent Zone Control: Separate digital PID controllers for the main reservoir and the injection nozzle ensure consistent viscosity throughout the flow path.
- Nozzle Freeze Prevention: Independent nozzle heaters stop wax from skinning over or solidifying between cycles.
- Thermal Stability: Look for sensors capable of maintaining temperatures within +/-0.2°C to prevent thermal shrinkage and structural stress in patterns.
Vacuum Evacuation Capability to Eliminate Pattern Porosity
Standard pressurized injection often traps air pockets in deep cavities, thin walls, and fine filigree sections.
- Pre-Injection Evacuation: Integrated vacuum pumps pull ambient air out of the clamped mold cavity prior to wax release.
- Bubble-Free Fills: Removing air pockets enables molten wax to enter under lower injection pressure, eliminating micro-porosity and unfilled margins.
- Reduced Scrap Rates: Vacuum-assisted injection significantly reduces internal voids, meeting stringent casting quality standards for reliable metal parts during subsequent burnout and pouring.
Adjustable Clamp Pressure and Multi-Directional Nozzle Alignment
Consistent sealing prevents parting-line flash while protecting flexible rubber and silicone molds from crushing.
- Fine Pressure Tuning: Pneumatic auto-clamps must allow micro-adjustments to match mold durometer and cross-sectional surface area.
- Multi-Axis Alignment: A multi-directional nozzle head (X, Y, and Z adjustments) guarantees dead-center alignment with the mold sprue, ensuring an airtight seal without manual holding.
- Repeatable Clamping Force: Consistent mechanical pressure prevents operator fatigue and ensures shot-to-shot consistency across multi-cavity runs.
Tank Capacity and Melt-Down Recovery Speed
Machine capacity should align with your daily shot volume to avoid production bottlenecks caused by long thermal recovery times.
| Feature Metric | Low-Volume / Studio Spec | High-Volume Industrial Spec |
|---|---|---|
| Tank Reservoir Capacity | 2 to 3 Liters | 5 to 10+ Liters |
| Heating Recovery Time | 45–60 minutes from cold | Fast-recovery submerged elements (<30 mins) |
| Sealing System | Single O-ring seal | Dual high-temp fluoroelastomer gaskets |
| Pressure Regulation | Manual analog regulator | Digital precision regulator (0.01 MPa steps) |
| No. | Item | Technical Specification |
| 1 | Model | SL-16-2-L |
| 2 | Power Supply | 380 V + 220 V / 50 Hz |
| 3 | Power Rating | 9.8 kW |
| 4 | System Pressure | 14 MPa |
| 5 | Wax Injection Pressure | 1–7 MPa |
| 6 | Clamping Force | 16 tons |
| 7 | Clamping Speed | 40 mm/s |
| 8 | Wax Injection Speed | 0–0.3/s |
| 9 | Wax Injection Time | 0–999 S/M |
| 10 | Maximum Wax Injection Volume per Cycle | 3 L |
| 11 | Injection Nozzle Vertical Travel | 150 mm |
| 12 | Injection Nozzle Forward and Backward Travel | 200 mm |
| 13 | Wax Tank Capacity | 80 L |
| 14 | Effective Working Space | 610 × 550 × 500 mm |
| 15 | Overall Dimensions (L × W × H) | 3200 × 1800 × 2700 mm |
| 16 | Machine Weight | 3000 kg |
A well-sized reservoir paired with high-wattage heating bands delivers continuous molten wax during rapid, repetitive cycles without dropping below target injection temperatures.
Step-by-Step Wax Injection Machine Setup and Operation
Running a wax injection machine requires dialing in heat, air pressure, and vacuum times before producing production runs. Mastering this setup prevents flawed patterns early in the production cycle, aligning directly with standard casting process steps.
Setting Optimal Melt Temperatures
- Tank temperature: Set the main reservoir to the manufacturer's recommended range for your specific casting wax, typically between 68°C and 73°C (154°F–163°F). The wax must remain fully liquefied without overheating or breaking down.
- Nozzle temperature: Set the injector nozzle 1°C to 2°C higher than the tank. This temperature gradient prevents premature freezing at the injection point and stops nozzle clogging.
Preparing Rubber and Silicone Molds
- Inspect all parting lines, registration lugs, and pre-cut vents for residual wax chips or shop debris.
- Apply a micro-layer of talc or release powder to silicone and vulcanized rubber cavities to aid air expulsion, shaking out any excess to avoid surface pitting.
- Verify that mold backing plates are clean and flat so clamping force distributes evenly.
Calibrating Vacuum Draw and Injection Pressure
- Vacuum draw: For vacuum-assisted injectors, apply a 2- to 4-second negative pressure cycle to exhaust trapped air from deep cavities before opening the wax valve.
- Injection pressure: Regulate working pneumatic pressure between 0.05 MPa and 0.2 MPa (7 to 28 psi). Filigree and delicate prongs benefit from steady, moderate pressure, while heavy solid pieces require controlled, lower pressure to prevent mold separation.
Clamping, Injecting, and Demolding
- Align and clamp: Center the mold gate directly over the nozzle. Apply firm, balanced mechanical or pneumatic clamping—excessive force deforms internal cavities, while loose clamping causes flash.
- Inject and hold: Fire the injection cycle and maintain contact for 3 to 6 seconds, allowing wax to backfill the cavity as liquid volume shrinks.
- Cooling: Allow the mold to rest for 15 to 30 seconds so the pattern solidifies completely before opening.
- Demold cleanly: Flex the mold gently outward along the cut lines and peel the rubber away from the pattern, rather than pulling on the wax sprue, to prevent distortion or snapped prongs.
Troubleshooting Common Wax Injection Machine Defects
Operating a wax injection machine daily on the shop floor means dealing with occasional pattern flaws. When defects appear, we isolate the variable—temperature, pressure, or clamping—to restore smooth wax pattern casting quickly.
Fixing Air Bubbles and Incomplete Pattern Fills
Short shots and internal voids ruin pattern integrity before investment casting even starts. When patterns fail to fill completely or trap air pockets, we check three primary factors:
- Low Injection Pressure: Increase pneumatic pressure incrementally. Thin cross-sections and filigree work require higher initial velocity to fill before the wax chills.
- Low Wax Temperature: If the melt inside the digital wax injection pot drops below working range, wax solidifies prematurely inside narrow mold gates. Raise nozzle and tank heat by 1°C to 2°C at a time.
- Trapped Air: Cut shallow evacuation vents along parting lines in your rubber mold injection setup, or switch to a vacuum wax injection machine cycle to draw air out of cavities before injection for bubble free wax injection.
Preventing Wax Flashing Along Mold Parting Lines
Flashing occurs when molten wax forces its way between mold halves, creating thin fins that demand tedious manual clean-up.
- Excess Injection Pressure: Over-pressurizing the mold overcomes the clamp. Dial down injection pressure until the flash disappears while full fills remain intact.
- Uneven or Insufficient Clamping: When using a manual clamp, uneven hand pressure distorts rubber molds. We rely on an auto clamp wax injector to apply uniform, repeatable perimeter force across the entire mold face.
- Warped or Damaged Mold Plates: Inspect mold frames and rubber blocks. Over time, heat and pressure can warp plates, leaving gaps along the parting seam.
Solving Shrinkage Marks, Sink Holes, and Pattern Warpage
Thick sections of a wax pattern often suffer from surface depression or internal voids as the wax cools and contracts. Dealing with heavy geometries requires proven techniques for fixing wax pattern shrinkage in complex molds.
- Excessive Melt Heat: Running a temperature controlled wax pot hotter than necessary expands the wax excessively, leading to severe contraction upon cooling. Drop the tank temperature to the lowest viable flow point.
- Premature Demolding: Opening the mold too fast causes warpage and sink marks. Extend dwell time under clamp pressure by 2 to 4 seconds to let the pattern solidify completely.
- Inadequate Hold Pressure: Maintain nozzle contact pressure for a few extra seconds so the machine continues packing wax into the core while the outer skin solidifies.
Clearing Blocked Injector Nozzles and Contaminated Wax Pots
A fluctuating flow rate or sudden drop in pattern weight usually points to clogs or contaminated wax reservoirs.
- Purging Nozzle Buildup: Dried wax and charred residue gather at the injector tip over time. Heat the nozzle tip externally with a hot-air gun and run a clean brass probe through the orifice to dislodge debris.
- Draining Contaminated Reservoirs: Dust, mold release powder, and foreign particles settle at the bottom of the reservoir. Drain the melting chamber completely, wipe down the interior walls with lint-free shop cloths, and refill only with clean, virgin lost wax casting equipment wax pellets.
Maintenance and Care for Long-Term Wax Injection Machine Reliability
Preventive maintenance keeps your wax injection machine running with consistent cycle times and zero unexpected pressure drops. We rely on a strict shop-floor maintenance schedule to prevent contamination, seal degradation, and thermal drift.
Daily Nozzle Cleaning and Purge Routines
Wax residue degrades quickly when held at elevated temperatures, forming hardened carbon deposits inside the nozzle passage.
- End-of-shift purge: Purge 50–100 ml of fresh wax through the nozzle at the end of every production run to flush out sediment and trapped micro-bubbles.
- External nozzle cleaning: Wipe the brass nozzle tip while warm using a lint-free shop cloth and brass-safe solvent. Never use steel probes or drills to clear blockages, as scratches inside the orifice ruin laminar wax flow.
- Reservoir sediment check: Keep the tank lid tightly sealed during operation to prevent bench dust and investment powder from settling into the molten wax pool.
Inspecting and Replacing Vacuum Seals and Pneumatic Hoses
Pressure variations and weak vacuum cycles usually trace back to degraded elastomer components rather than pump failures.
- O-ring inspection: Check the silicone and rubber gaskets on the vacuum chamber and clamp assembly weekly. Replace any seal showing cracks, flattening, or wax glazing.
- Pneumatic line checks: Inspect quick-connect fittings and polyurethane air hoses for micro-leaks using soapy water or an ultrasonic leak detector. A drop of just 2 PSI during an injection stroke causes short fills in fine filigree.
- Filter draining: Drain moisture traps on incoming air lines daily. Water droplets entering the pneumatic cylinders cause piston stutter and inconsistent clamp force.
Routine Calibration of Temperature Sensors and Pressure Gauges
Digital controllers can drift over months of continuous heating cycles, distorting your actual melt viscosity.
- Dual-zone temperature verification: Use a calibrated digital contact thermometer to check actual molten wax temperature against the machine readout monthly. Measure both the core reservoir wax and the nozzle tip.
- Sensor offset adjustment: Re-calibrate the PID controller offset if the sensor reading deviates by more than ±1°C from actual pool temperatures.
- Pressure gauge recalibration: Verify the primary air regulator and vacuum gauge against a master gauge quarterly. Precise pressure regulation ensures predictable pattern shrinkage, which is critical downstream where understanding the difference between forging and casting explained guides final dimensional tolerances.
Wax Injection Machine FAQs
What is the ideal temperature setting for jewelry wax injection?
Most jewelry casting waxes inject cleanly between 65°C and 75°C (150°F to 168°F). We always run the injector nozzle 2°C to 3°C warmer than the main reservoir tank. This prevents thermal shock and stops the wax from freezing as it enters the rubber mold.
Why does my wax pattern come out brittle or deformed?
Brittle or distorted patterns usually stem from three common shop-floor issues: Premature demolding: Pulling the pattern before the core has fully solidified. Overheated wax: Thermal degradation destroys the plasticizers in the wax, leaving it weak. Improper clamp force: Uneven manual clamping warps the mold cavity under pressure.
If you are dealing with structural defects or shrinkage, check out our guide to wax injection troubleshooting for specific parameter adjustments.
How does vacuum wax injection compare to standard pneumatic injection?
- Standard pneumatic injection: Uses compressed air to push molten wax into the mold. It works well for flat bands and simple charms, but it can trap pocket air inside intricate designs.
- Vacuum wax injection: Draws air out of the mold cavity before injection. This pre-evacuation eliminates backpressure, delivering sharp edges, zero micro-bubbles, and reliable fills on fine filigree.
What air compressor pressure is required to run a wax injector?
We recommend feeding your wax injection machine an incoming line pressure of 4 to 6 bar (60 to 90 psi), but your actual injection pressure regulator should stay low—typically dialed between 0.5 to 1.8 bar (7 to 25 psi). Running excessive injection pressure will force mold flash along the parting line.
How often should casting wax in the reservoir be replaced?
We recommend draining, cleaning, and refilling the pot every 3 to 6 months under regular production. Over time, wax kept at elevated temperatures oxidizes, loses elasticity, and accumulates sediment at the bottom of the pot. Follow our detailed routine for replacing wax in injection pot systems to keep your nozzle clear and pattern quality consistent.
 English
 Russian
 German